 CAST-IN-PLACE
Concrete Counters
For durable, attractive counter, use the right concrete mix and highlt skilled finishers.
BY TOM RALSTON
 |
 |
 |
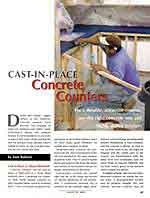
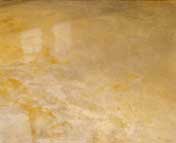
Despite the simple, rugged nature of the material, concrete counters have become very popular in high-end kitchens and baths. Some homeowners choose this material because it can be produced in any color or texture they want. Others just like the way the product looks: Because they're crafted by hand, no two concrete counters are ever exactly the same.
![]()
Cast-in-Place vs. Shop-Fabricated
Concrete counters can be cast in place or fabricated in a shop. Shop methods place a premium on carpentry skill, while casting counters in place requires better concrete-finishing skills. I own a concrete company that specializes in decorative finishes. Since we have many good finishers, we usually pour counters in place.
Shop-fabricated counters are produced off site, then transported to the job and installed in the same manner as granite slabs. They're poured upside down and cured in the form; the shape and texture of the finished surface are largely determined by the form.
Cast-in-place counters are poured right side up, so the shape and texture are heavily influenced by the finisher. First, a continuous plywood top is installed on the cabinets; edges, penetrations, and overhangs are temporarily formed. Reinforcing is then installed, and the concrete is placed. As soon as the concrete starts to set, the edges are stripped and the visible parts of the counter are hand-finished with the same tools and techniques used for other kinds of concrete flatwork. You can float, trowel, grind, or use textured mats to finish the surface.
A matter or taste. Site-cast and shop fabricated counters are similar but not the same. A shop-fabricated counter may be perfectly straight, flat, and smooth. Site-cast counters may be extremely smooth, but they're unlikely to be as flat or uniform as a shop-cast slab.
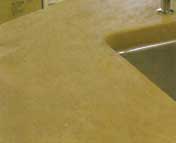
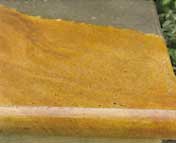
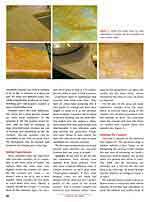
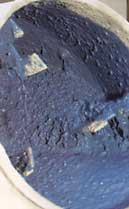
Figure 1. Given the many ways to color and texture concrete, no two counters are exactly alike.
 |
 |
 |
 |
 |
It's really two different looks. The subtle irregularities produced by hand finishing give cast-in-place counters a more hand-crafted look.
Finishes aren't the only difference. The forms for a shop-poured counter are built from templates. If the template is off, the counter won't fit. Also, slabs are hard to transport, so large shop-fabricated counters are cast in sections and assembled on site. By contrast, site-cast counters can be monolithic pours, with no seams. Even the backsplash can be formed and poured as an integral part of the top.
Setting Expectations
Most customers have no experience with concrete counters, so it's important to tell them what to expect. We explain that the color may vary slightly across the counter. It's possible the counter will crack - we haven't seen a lot of it, but it does happen. Thick counters are less likely to 'crack than thin ones. Ideally, a counter should beat least 11/2 inches thick at the thinnest spot. On occasion we've gone as thin as 11/4 inches, but we prefer to pour 2-inch counters.
Customers need to understand that concrete may stain over time. They have an easier time accepting this if they know it's coming and have been taught to think of it as the development of patina. Counters can be sealed to prevent staining, but the most effective sealers give the surface a shiny, resin-coated look that some people find objectionable. A less obtrusive sealer may provide less protection. People who want things to look exactly the same five years down the road are poor candidates for concrete counters.
We also warn homeowners not to put red-hot pans directly on concrete: Extreme heat can cause it to spall.
Samples. By the time we get the job, the customers have already seen samples from other projects. They may want a slightly different color or texture, however, so we'll pour three 2-foot--square samples. If they want integral color, we tell them the samples will be close, but not a perfect match to the color of the actual counter. This is because samples are mixed in tiny batches; minor variations in the proportions can affect the results. On the other hand, surface treatments like dust-on color are easier to duplicate.
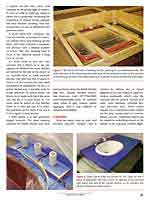
On the day of the pour, we make additional samples from the same batch of concrete that's going in the counter. We can then experiment with the samples to show the customers what the counter will look like when it's treated with various stains and sealants (see Figure 1).
 Forming the Counter
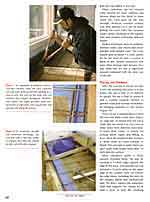
Concrete is poured on the plywood top (Figure 2). The plywood edge is hidden behind a face frame or by thickening the nosing. If the counter has any kind of overhang, we build a temporary shelf to support the nosing when it's poured and while it cures. The shelf can be anything; we normally put a 2x4 on the flat and prop it up with legs. To avoid damaging the cabinets, we wedge or clamp it in place.
We typically need to remove doors or drawer fronts to install the shelf. Before starting, we use blue tape and plastic to mask the cabinets and nearby walls. If there's a finished floor, we'll protect it, too. We cover the plywood top and adjoining walls and cabinets with Kraft building paper. This prevents them from absorbing excess moisture or wicking color from the wet concrete.
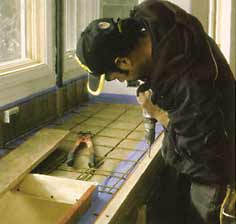
Figure 3. The front edge is formed by a strip of wood as tall as the counter is thick. It's separate from the support shelf, so it can be removed when it's time to finish the edge.
Edges that don't butt to existing surfaces are formed by fastening strips of wood to the temporary shelf (Figure 3). Curved edges can be formed with 1/4-inch hardboard. Integral splashes are formed by suspending a board just off the back wall and parallel to it. The board is supported by temporary legs, which can be removed once there's some concrete under the bottom. edge.
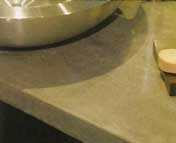
Fixtures and appliances. Every opening through the counter is formed before the concrete is poured. It's not hard to form holes for faucets, but we need to know in advance what size they are and exactly where they go. Cook tops and drop-in sinks are simple to form because the edge of the opening is covered by a flange (Figure 4). Undermount sinks are trickier because the edge is visible and has to be finished. Undermount sinks are installed flush to the plywood top before we get to the job.
Figure 4. Openings for appliances and drop-in sinks are cut through the top in advance. The counter is then formed to the inside of the cutout.
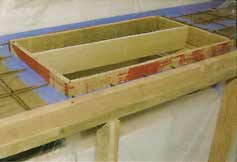
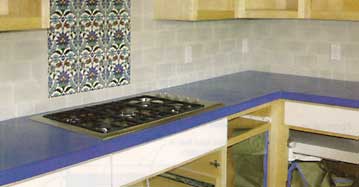
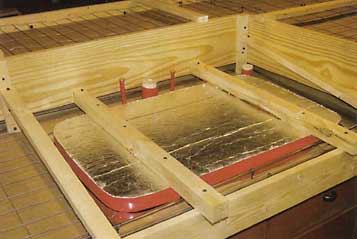
Figure 5. This foil-faced foam is blocking out the opening for an undermount sink. The foam and most of the wood forms pictured here will be removed as soon as the concrete is hard enough to finish. The undermount sink is already in place beneath the Kraft paper.
Undermount sink form. Foam insulation is good for blocking out undermount sinks because it's easy to cut and can be removed by breaking it into pieces. We put the paper template that comes with the sink on the foam and transfer the shape by poking a series of holes through the line. We cut the foam with a jigsaw, then smooth the edges with sandpaper. We wrap the edge with red plastic tape to fill voids and prevent concrete from sticking, then install the foam over the sink with cleats (Figure 5).
Faucets. We form faucet holes with short pieces of PVC pipe. The pipe can be removed when the slab begins to set. Most faucet stems are long enough to go through a couple of inches of material.
But if the combined thickness of counter and plywood is too great, the plumber will not be able to install the nut that holds the faucet in. To avoid this, we cut an oversized hole through the plywood under the faucet and cover the hole with a piece of foam.
The foam keeps the concrete out of the cabinet, but it's soft enough that we can poke holes in it and use it to hold the PVC. We continually check the pipes for plumb because it's easy to knock them out of position. When the slab is cured, the plumber can easily dig out the foam from below and seat the fastening nuts against the bottom of the slab (Figure 6).
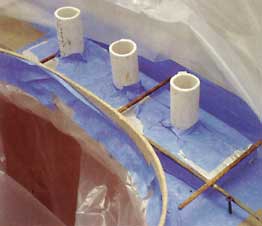
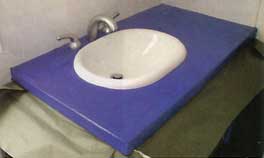
Figure 6. These faucet holes are formed by PVC pipe set into a piece of rigid foam. The foam covers an opening in the plywood and makes that part of the counter thinner so the plumber has plenty of thread to install fixtures.
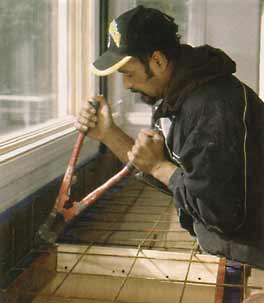
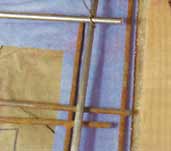 Figure 7. it's important to properly reinforce concrete counters. Here, the form carpenter cuts 6x6 wire mesh around the opening for a drop-in sink. The wire on the back wall will reinforce the integral backsplash. Stainlesssteel pencil rod (right) provides extra reinforcement at high-stress areas around the sink opening and along the nosing.
Reinforcement
Concrete counters should contain some kind of reinforcement like rebar, wire mesh, or fiber mesh in the mix. We normally use 6x6 flat wire mesh. You can also use number three rebar, but only in thicker slabs. There's not enough coverage for rebar in a 2-inch counter. We try to add extra reinforcement at stress points such as overhangs, inside corners, and areas where the counter goes from wide to narrow (Figure 7).
Reinforcement should run through the entire counter and into the integral backsplash. We place the wire mesh close to the center of the slab and hold it in about 1/2 inch from edges. We use tie wire and drywall screws to secure the mesh to the plywood. That prevents it from shifting and poking through at the edges.
Regular reinforcing materials work fine, but if you're concerned about corrosion, you can use galvanized or even stainless-steel materials. Theoretically, water could pass through a crack, rust the reinforcing materials, and cause even more cracking. I have seen this happen to pool copings but never to concrete counters.
The Right Mix
The concrete should contain Portland cement, sand, potable water, and well-graded angular aggregate. We use as little water as possible for a good, stiff mix with only 3 or 4 inches of slump (Figure 8).
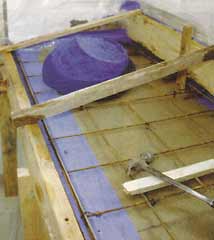
Figure 8. To maximize strength and minimize shrinkage, use concrete with a very low waterto-cement ratio. The mix should be stiff and difficult to spread.
We prefer a regular six-sack mix; each yard contains six 94-pound bags of cement. It cures to 3,000 or 4,000 psi, which is plenty for a countertop. Increasing the proportion of cement boosts strength but may increase cracking. One way around this is to use an admixture that prevents cracks.
A good ready-mix company can save the trouble of mixing the material, adding color, and cleaning up the mess, but most concrete companies can produce only a limited number of colors. Plus, the working time is short if the material spends a long time in transit.
It's more work to mix our own concrete, but it allows us to use any pigment or additives we want. Batches are limited by the size of the mixer, so we typically have to make multiple batches. The only way they're going to match is if they contain the exact same proportions of ingredients. We use a 5-gallon bucket and a portable scale to weigh materials. To reduce errors, we always try to make each batch the same size. We use a 1/3-yard mixer, SO 11/4 yards could be mixed in four batches (three at 1/3 yard and one at 1/4 yard). But problems are less likely if we mix it in five equal 1/4-yard batches.
A third option is to buy premixed, bagged concrete. I've done training seminars for Buddy Rhodes and have
had good luck using the Buddy Rhodes Bag Mix. (Buddy Rhodes Studio, San Francisco, Calif.; 877/706-5303, www.buddyrhodes.com). It contains sand, white or gray cement, perlite aggregate, and a clay additive to enhance trowelability.
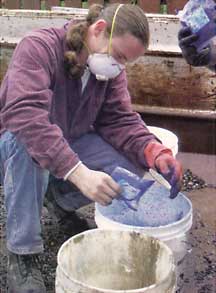
Figure 9. In mixing integrally colored material, the pigment is added to the water so that the color is evenly dispersed when the dry materials are added.
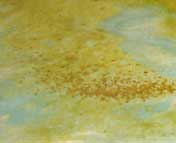
Coloration
There are many ways to color and decorate concrete. Integral color is created by adding dry or liquid pigment to the mix (Figure 9). Surface treatments, which color the concrete after it's poured, include acid stain, color hardener, colloidal dye, and universal tints. Some colors require you to substitute white cement for the gray cement that's in conventional concrete. Additional effects can be created by embedding objects in the surface or by exposing colorful aggregate that was added to the mix.
Many customers opt for integral color because it's more uniform and because dings are less likely to show when the color goes all the way through. However, counters contain very little material, so it can be tricky getting the exact color the customer wants. Minor variations in the ingredients may produce noticeably different results.
Surface treatments allow for patterns, mottled colors, and effects that aren't possible with integral color. The color usually goes in about 1/16 inch, plenty far for the kind of wear a counter is likely to get. Surface treatments cost more than integral color because they add labor, but it's not a significant amount compared with the total cost of the job.

Figure 10. A cordless vibrator consolidates the concrete so that there are no bug holes and rock pockets in the edge.
Placing and Finishing
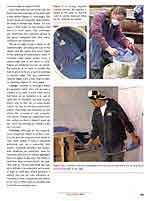
After the concrete is mixed, we haul it into the building and place it in the forms. The mix is stiff, so it's difficult to spread. We use a float to spread it and a cordless concrete vibrator to prevent voids and increase workability by bringing moisture to the surface (Figure 10).
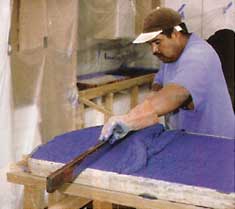
Figure 11. In mixing integrally colored material, the pigment is added to the water so that the color is evenly dispersed when the dry materials are added.
Next, we use a straightedge to screed the concrete flush to the form (Figure 11). To ensure that the top is really flat, we screed it or rod it two or three times from different directions. A wood float comes in handy for cutting down highs and filling in lows. Once the counter is flat, we leave it alone until it's hard enough to finish. The concrete is ready when you can't push your finger more than 1/8 inch into the surface.
Most customers prefer a hard, smooth, troweled finish. We start by running a 1/4-inch edger against the edge of the form. This smooths the top and puts a 1/4-inch radius on the upper edge of the counter. Next, we remove the edge forms, including the ones for the integral splash and undermount sink. We don't remove the temporary shelf that supports the nosing for at least a week, or until the overhang cures enough to support itself.
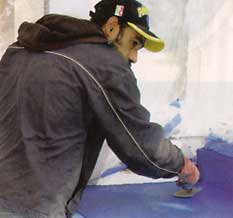
Figure 12. This counter is being given a hard-troweled finish. Note the integral backsplash.
Once the forms are out of the way, we finish the face and edge of the slab with a steel trowel (Figure 12). The trowel produces a smooth, tight surface. To make it harder and denser, we can spray a little water on the counter and trowel it some more. This technique also burnishes the concrete, giving it the aged, variegated look that many customers are looking for.
We use an edger to put a radius on all exposed edges, including the top of the splash and the upper and lower edges of the opening at undermount sinks. A rounded edge looks better than a square edge and is less likely to chip. Edgers are designed for use on broad, flat surfaces, so we have to modify the tool to get it to fit on a Curved opening or narrow edge. We also sometimes smooth edges with a taut strip of plastic sheeting (Figure 13).

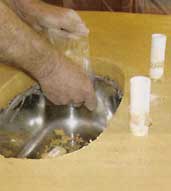
Figure 13. Standard concrete-edging tools can be used to round the corners of the counter (left). Another way to finish curved edges is to rub them with a taut strip of plastic sheeting (right).
Curing. Concrete is strongest when it's properly cured. One way to cure a counter is to mist it with water every half hour or so. Another is to seal it right after it's finished, but that usually limits you to the use of water-based sealers. We like to tent the counter with plastic. That keeps the humidity in and allows the concrete to cure properly. The plastic should be suspended over the surface so that it doesn't mess up the color by coming in contact with the concrete.
Polishing. Although it's not required, we're frequently asked to polish counters. We give the concrete a few weeks to cure, then polish it with a diamond polishing pad on a water-fed disk sander. Polishing densities the surface and produces an attractive look by exposing sand fines or colored aggregate that was added to the mix. The finish is smoother than a trowel finish. We typically start at 120 grit and work our way up to 400 grit. On some jobs, we've gone as high as 3,000 grit, which produces a surface you can see your reflection in. Grinding is time consuming and messy, so we use as little water as possible and mask the surrounding area.
Sealing
Concrete counters should be sealed to decrease the likelihood of staining, but there's no such thing as a stainproof concrete counter. The most effective stain-prevention is 100% epoxy sealer, but it looks kind of plastic. Most people prefer a matte finish because it preserves the "concrete look." We have successfully used a penetrating sealer followed by a lowgloss polyurethane. Sometimes we use three to five coats of acrylic sealer followed by a coat of acrylic wax or beeswax. Before wax is used, make sure the homeowners understand that they will have to renew the wax several times a year.
There are enough sealers on the market that you could devote a whole article to them. They can be silicone, polyurethane, epoxy, lacquer, acrylic, or water-based. Before using any of them, it's important to read and carefully follow the manufacturer's recommendations. The common mistake is to apply the sealer before the counter is at the proper stage of curing.
Cost
While concrete doesn't cost much, concrete counters are expensive because it takes a lot of labor to produce them. We operate in an area with high wages and a high cost of doing business. Around here, concrete counters cost about $100 per square foot, which is comparable to the cost of granite. The cost in your area will depend on labor rates and the degree of local competition.
Tom Ralston is a third-generation concrete contractor and the owner of Tom Ralston Concrete in Santa Cruz, Calif, which does structural, decorative, and specialty concrete work.